9 min readUpdated 6 October 2026
When your product options are not showing on your Shopify storefront, the cause is nearly always one of six things. They are listed here from most to least likely, so work down the page in order — the first three checks resolve most stores, and each one takes about a minute.
1. The experience is still a draft
In the customizer, Save and Publish are two separate actions. The primary button reads Save while you have unsaved changes, then flips to Publish once your work is stored. Saving alone does not put anything on your storefront.
Check. Open the Everfield dashboard and look at the Status column in the experience list. Only an experience marked Active renders to customers — Draft and Inactive do not.
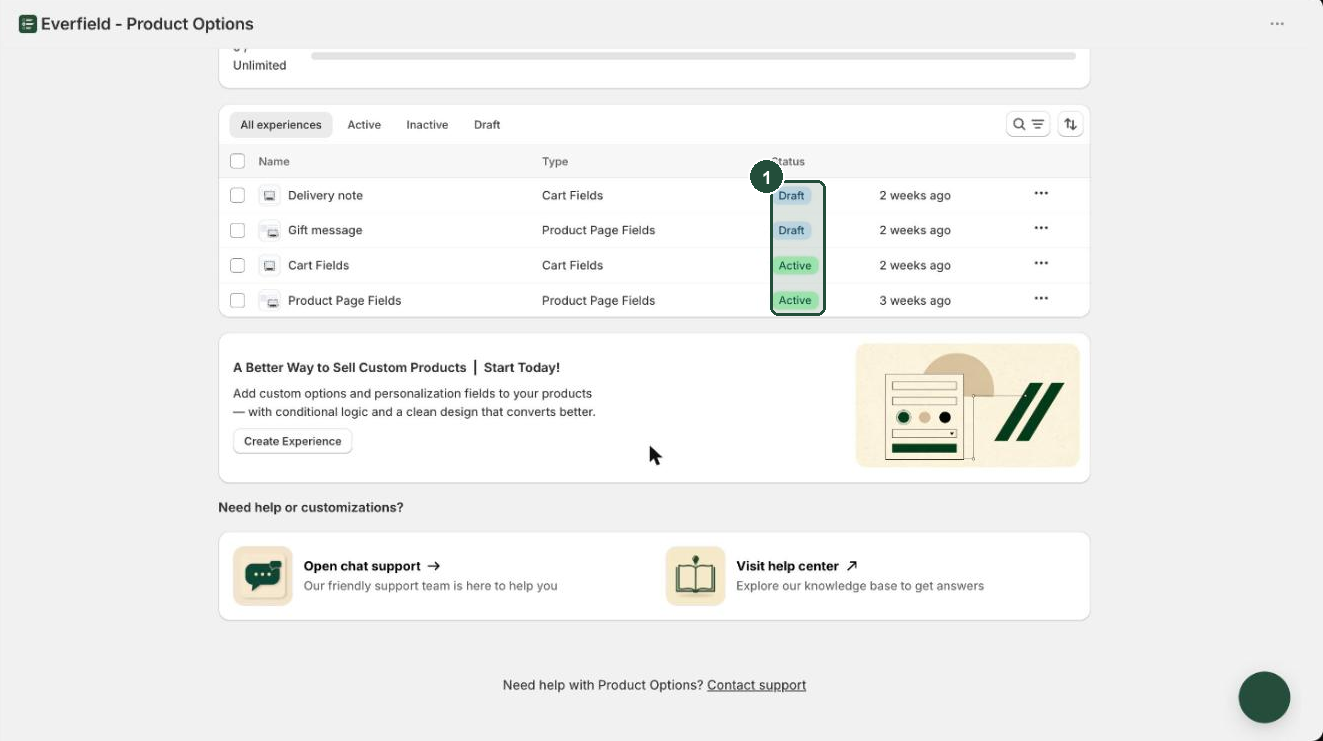
Fix.
- Click the Draft tab above the list to see everything still in draft — an experience you unpublished returns there too. Inactive holds experiences you archived. Neither renders.
- Open the experience you are testing.
- Click Publish.
- Reload your storefront page.
Once an experience is published, later edits need only Save. It stays published and the storefront picks up the change — you do not publish again.
2. The app embed is off in your published theme
Everfield reaches your storefront through an app embed in your theme. Until that embed is switched on and saved in your published theme, nothing renders, however your experiences are set up.
Check. On the dashboard, look for the warning banner titled Your options aren't live on the storefront yet, with an Activate app embed button. If that banner is there, the embed is off.
Fix.
- Click Activate app embed. Your theme editor opens with the App embeds panel filtered to Everfield.
- Confirm the Everfield Product Options toggle is on.
- Click Save in the top right of the theme editor. This is the step most people miss — the toggle does nothing until you save. No theme files are changed.
The embed is per theme. Turning it on in one theme does nothing for any other, so if you publish a different theme later — including a duplicate of your current one — switch it on there too.
Two related points:
- The Product Options block (see cause 5) loads Everfield on product pages by itself, so product options can work even with the embed off. The block only loads on product templates, though — your cart page, and any cart drawer opened from a page other than a product page, still need the embed.
- If you rely on the block alone, the embed warning clears once the block is saved and visible on any product template in your published theme — including when it sits inside another block, such as a group.
The full walkthrough is in Turn on the Everfield app embed.
3. Targeting is excluding the product
A published experience can still be deliberately hidden on the exact page you are looking at. Open the experience and go to the Settings tab, which holds Product targeting, Country targeting and Device visibility. All three need the Advanced plan or Unlimited Plus to change — on Free or Basic the controls are shown but inert, and rules you set on a paid plan keep applying to your storefront after a downgrade, so they can still be what is hiding your options.
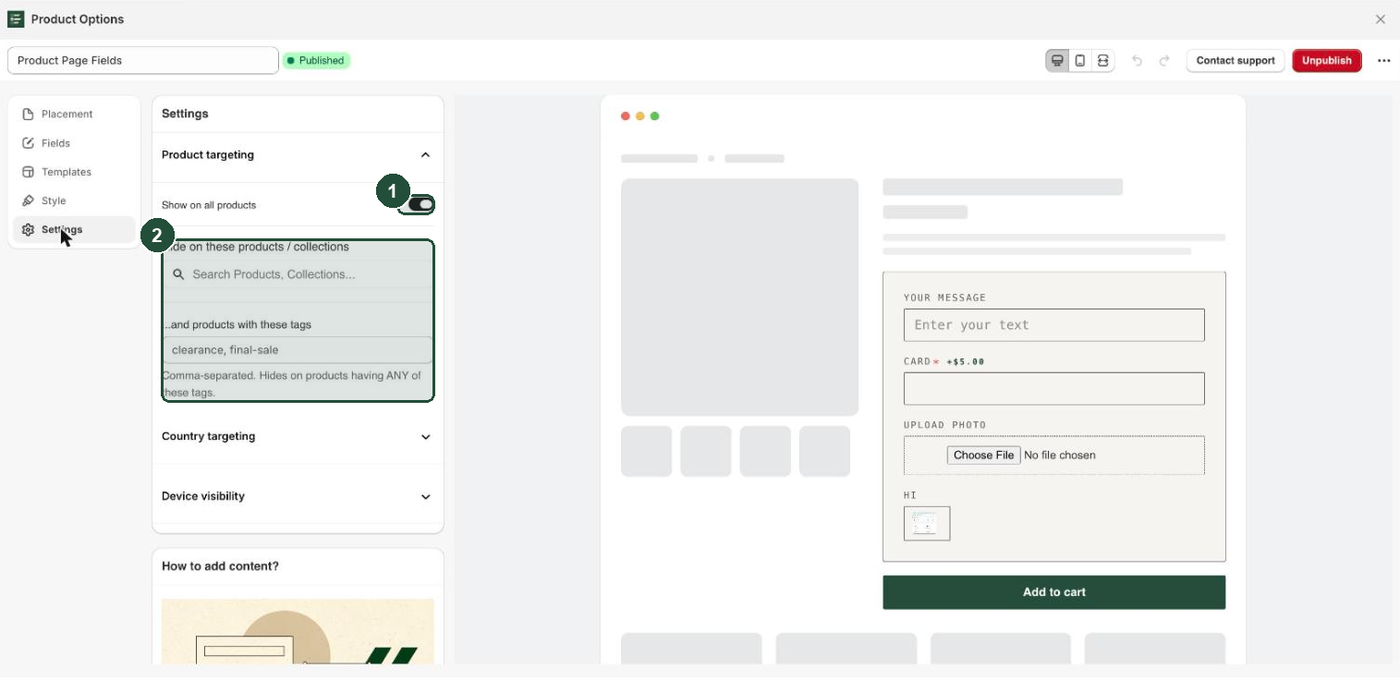
Product targeting hinges on the Show on all products toggle, so read its state first — it changes which two fields sit beneath it.
- With it on, you get Hide on these products / collections and ...and products with these tags. Anything listed there is excluded. Tags are comma-separated and matched case-insensitively, and a single matching tag is enough to hide the experience.
- With it off, you get Show only on these products / collections and ...or products with these tags. Now the experience appears only where you have listed it, so a product you forgot to add is a common cause.
Country targeting works through Show in all countries. Turn it off and the experience appears only for the countries listed in Show only in these countries. The country comes from your storefront's country or market selector, not from the shopper's IP address. With Show in all countries on, the experience is hidden in any country listed in Hide in these countries — check that list if a country is unexpectedly missing.
Device visibility offers Hide on mobile and Hide on desktop. This is the most common self-inflicted cause: testing on your phone with Hide on mobile switched on. "Mobile" here means a browser window narrower than 768 pixels, measured once when the page loads — so a narrow desktop window counts as mobile, and resizing the window does not re-check.
Fix. Compare each of the three sections against the exact product, country and device you are testing with, adjust the rule that is catching your test page, then click Save.
Product, collection and tag rules are only applied on product pages. A cart experience opened on the cart page is filtered by country and device only.
4. Another experience is winning
For each placement — product page and cart — only one published experience ever renders: the first published one that passes targeting. The rest are ignored. So a second published product-page experience silently never appears, even though everything about it looks correct.
Check. On the dashboard, open the Active tab and read the Type column. Count how many active experiences you have of the type you are testing: Product Page Fields or Cart Fields. More than one for the same type means only one of them can show.
Fix. Unpublish the ones you do not want until exactly one active experience remains for that placement, then reload your storefront page and confirm the right one appears. There is no ordering or stacking control — if you need both sets of fields, combine them into a single experience (up to 20 fields) and use conditional rules to show the right ones. Conditional rules need the Basic plan or above.
5. Your theme hides the automatic placement
By default Everfield places your fields automatically, just above your theme's Add to cart button. To do that it has to find the add-to-cart form in your theme. Some themes build the product page differently, and then the fields either do not appear at all or land at the bottom of the form, below the button.
Check. On the dashboard, look for the info banner titled Choose where your options appear on the product page, with an Add to product page button. If your experience is published, targeting is clear, the embed is on, and the product page still shows nothing, this is the likely cause.
Fix. Place the block by hand.
- Click Add to product page. Your theme editor opens on the product template.
- Drag the Product Options block to where you want the fields to appear.
- Click Save.
If the banner is not there — it can be dismissed — do the same by hand: Online Store → Themes → Customize on your published theme, switch the template selector to a product page, then Add block → Apps → Product Options, drag it into place and click Save.
The block takes priority over the automatic placement, so once it exists your fields render there and nowhere else on the page. That also makes it the reliable way to control exactly where your options sit.
6. Cart options are landing in the wrong place
Cart experiences mount just above your checkout button, using a CSS selector matched to your theme. Everfield ships a library of known themes; for a theme it does not recognise it falls back to a default position, which may put the fields somewhere odd or leave them off the page.
Check. Open Cart selectors in the left nav and read the Match column. Matched means your theme is in the library; Default position means a fallback was used. A warning banner titled Some themes aren't in our library yet names the themes affected.
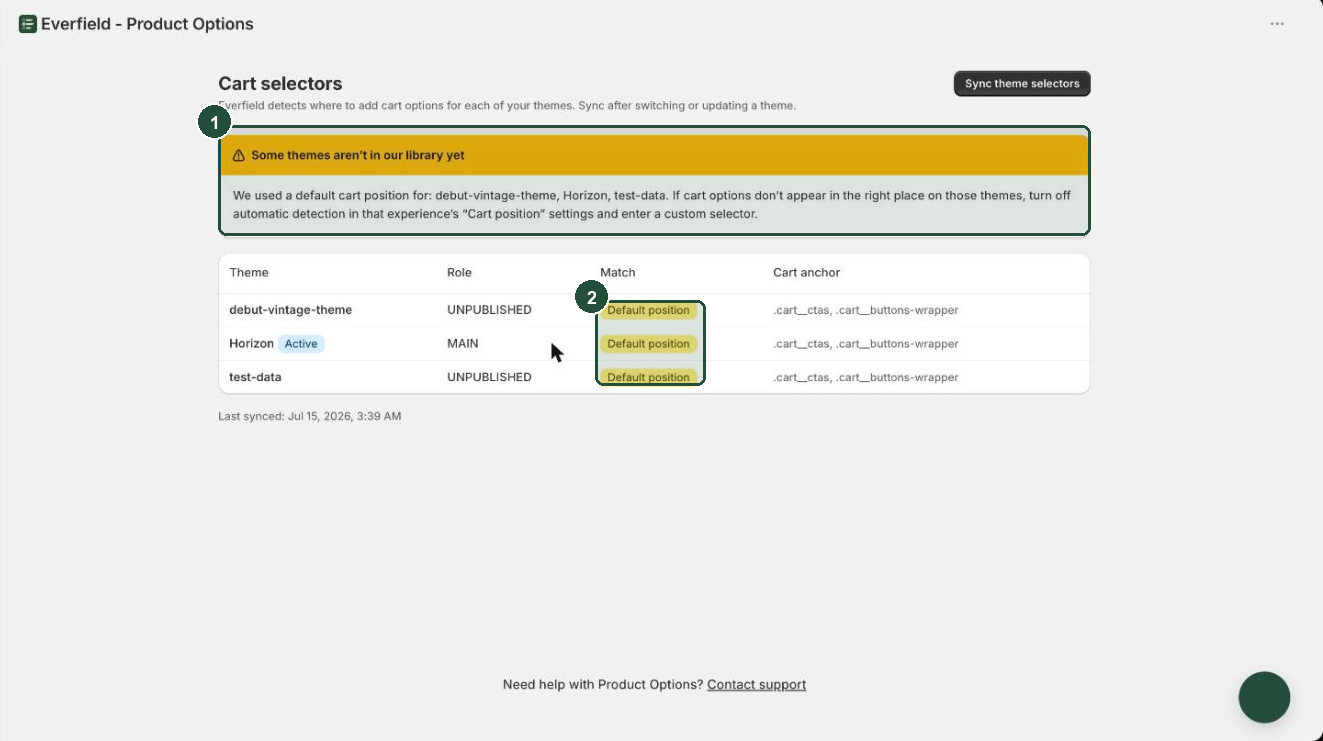
Fix.
- Click Sync theme selectors. Do this whenever you switch or update a theme.
- If your live theme still reads Default position, open the cart experience and go to the Placement tab, section Cart position.
- Turn off Detect cart position automatically.
- Enter your theme's checkout button selector in Checkout button selector — for example
.cart__checkout-button. The fields appear directly above whatever this matches. - Click Save, then reload your cart.
One trap: with automatic detection off and Checkout button selector left empty, nothing mounts at all. Either fill the field in or switch automatic detection back on.
If your cart is a third-party drawer that renders inside a Shadow DOM — Rebuy Smart Cart and CartX are the common ones — open Advanced: Shadow DOM support and set Shadow host selector. That field only appears once automatic detection is off, so you will need to supply a checkout button selector as well. Only open shadow roots can be reached; a cart app using a closed one cannot be mounted into.
More detail is in Add options to your Shopify cart page.
Troubleshooting
One field is missing but the rest of the set shows. That field has a conditional rule pointing at a field label that no longer exists — usually because the controlling field was renamed. Rules match the controlling field by its exact label, so a stale label reads as an empty answer: an equals rule then never matches and the field stays hidden permanently. Open the Fields tab, find the rule under the affected field, retype the current label in When field (label), and click Save.
A field with a variant rule behaves differently in the live preview. The preview has no product variant to read, so a variant rule compares against an empty value — a field shown on equals, includes or is not empty never appears there, while one shown on does not equal or is empty always does. Check variant rules on a real product page instead of in the preview.
Options do not appear in the quick-add button on a collection page. Quick add does not carry option fields. The product is still added to the cart, without the fields. Point customers at the full product page when your options matter.
Everything worked until you changed themes. The app embed is stored per theme. Publishing a new theme, or a duplicate of your old one, means switching the embed on again in that theme and clicking Save.
Still stuck?
If you have worked through all six causes and your options are still not showing, get in touch. Open Help Center in the left nav and choose Start chat, use the Contact support link at the bottom of any page in the app, or email hello@usenormalize.com.
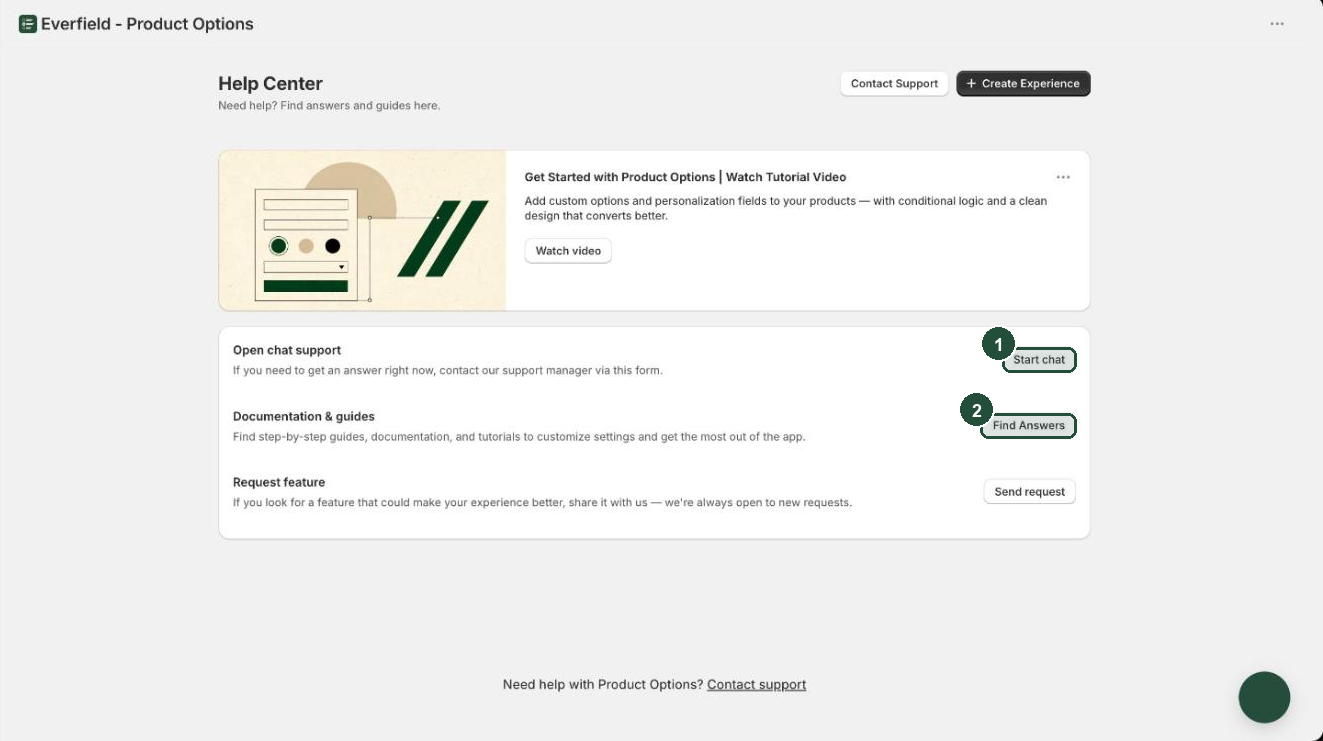
Include these three things in your first message so support can reproduce what you are seeing straight away:
- Which theme is currently published on your store.
- The name of the experience and its status — Active, Inactive or Draft.
- The exact product URL you tested on.