8 min readUpdated 6 October 2026
A required field stops a customer adding to cart until they answer it, and character limits keep that answer to a length you can fulfil. Both are per-field settings in the Everfield customizer. This guide covers required fields, character limits, the live counter, and where validation does not run.
Mark a field required
Required is a toggle on each individual field, off by default — every new field is optional until you change it.
- Open your experience in the customizer and go to the Fields tab.
- Expand the field you want to make compulsory.
- Switch on Required.
- Click Save. If the experience is still a Draft, click Publish as well — a draft never reaches your storefront. An experience that is already Published updates on the storefront every time you save.
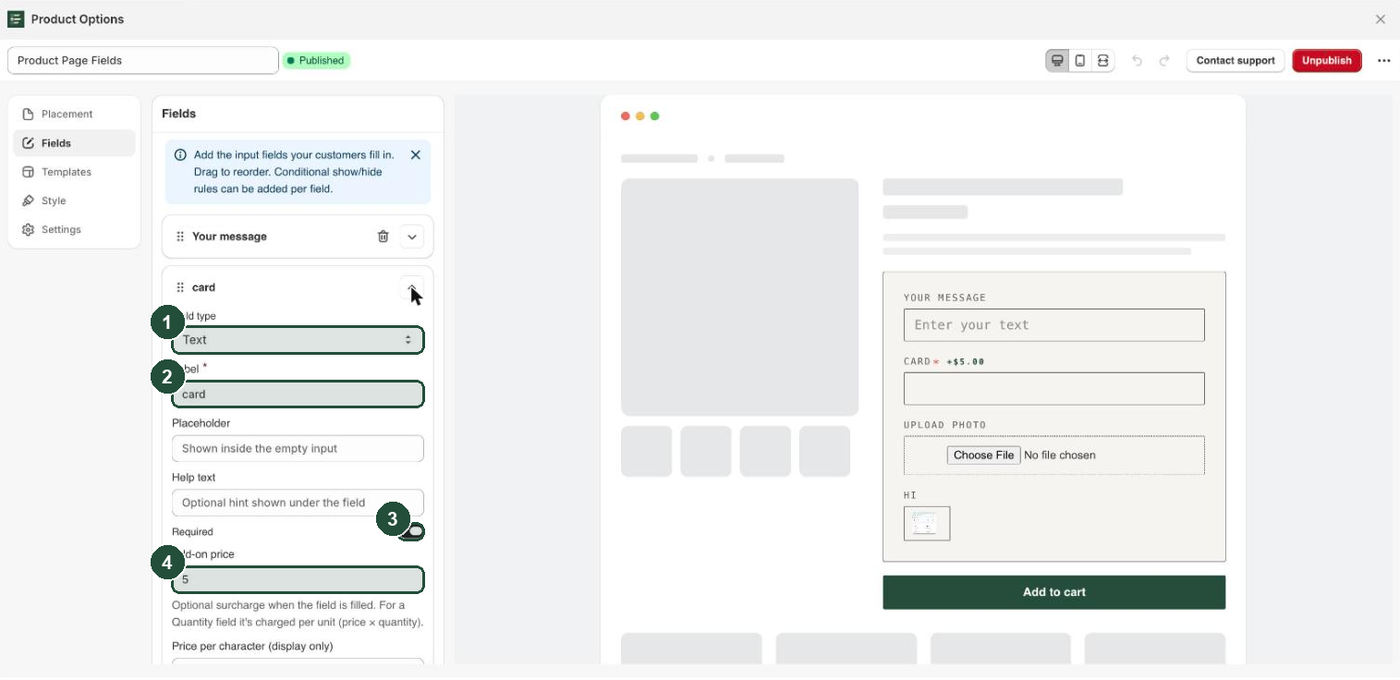
Required only exists on the 14 input types. The six display-only blocks — Heading, Paragraph, Divider, Spacer, Custom HTML and Size chart — collect nothing, so they have no Required toggle. See Field types.
What counts as "answered" depends on the type:
| Field type | What satisfies Required |
|---|---|
| Text, Text area, Number, Phone, Date | Anything entered |
| A value that looks like an email address | |
| Dropdown | Any choice other than the Select… prompt |
| Radio buttons, Swatch, Multiple choice, Product picker | At least one selection |
| Toggle / switch | Switched on — off saves nothing, so it reads as blank |
| File / image upload | One uploaded file |
| Quantity | A number above 0 — the starting 0 does not count |
File / image upload is a special case: a file input can't carry a required flag in the markup, so Everfield applies the setting from the storefront script instead. The effect is the same — a required upload blocks Add to cart until a file is uploaded.
A required field shows a red asterisk next to its label. That asterisk is controlled by the Style tab's Visibility section — Show required (*) indicator, on by default. Turning it off hides the asterisk; the fields stay required.
What a customer sees when validation fails
Everfield checks the fields when the customer presses Add to cart on a product page, or the checkout button on a cart experience. If a check fails, the action is blocked — the item is not added, the checkout click is stopped, or, from a theme's add-to-cart popup, the customer is taken to the cart page to complete the fields — and a message appears in small red text under the field that failed, which also gets a red border. These are the exact messages:
| Message | When it shows |
|---|---|
This field is required. | A required field left blank (every type except file upload), or a required Quantity left at 0 |
Please upload an image. | A required File / image upload with no file |
Please enter at least N characters. | Shorter than Minimum characters |
Please enter at most N characters. | Longer than Maximum characters |
Please select at least N. / Please select at most N. | A Multiple choice outside its selection limits |
Please enter a valid email address. | An Email value that is not an address |
Please choose a later date. / Please choose an earlier date. | A Date outside the range you set |
That date isn't available. Please choose another. | A Date on one of your Closed weekdays or Unavailable dates |
Please enter a valid number. | A Number or Quantity that is not a number |
Please enter at least N. / Please enter at most N. | A Number below Minimum value or above Maximum value, or a Quantity below 0 |
An upload that is still running blocks the add too, showing Please wait for the upload to finish. under the field. On a product page your theme's Add to cart button is also disabled for the duration and the field shows Uploading…, so customers rarely reach that point; on a cart experience the checkout click is held until the upload lands.
Errors are re-checked on every attempt, so a message disappears once the customer fixes that field and tries again. Everfield blocks the add whether your theme submits the product form normally or adds to cart with its own script. On a Phone field the red border lands on the country code dropdown rather than the number box; the message underneath is still correct.
The add-to-cart popup detour
One case navigates instead of blocking in place. On themes whose add-to-cart popup offers a checkout button somewhere the cart fields cannot render (Dawn-family themes with the cart type set to Notification), Everfield sends the customer to the cart page instead: the options scroll into view, the missing required fields show their red messages, and the first empty field is focused. Everfield first checks the answers already saved on the cart, so customers who have filled everything in go straight to checkout untouched. The detour fires at most twice per browser session, never on the cart page itself, and never for experiences whose fields are all optional — a required field shown only by a conditional rule does not trigger it either. See Cart placement for the placement side of this.
Minimum and maximum characters
Minimum characters and Maximum characters are offered on two field types only: Text and Text area. They carry the placeholders "e.g. 0" and "e.g. 200".
- In the Fields tab, expand a Text or Text area field.
- Type a whole number into Minimum characters, Maximum characters, or both.
- Save and publish.
Maximum characters stops the customer typing past the limit in the browser, so Please enter at most N characters. is rare in practice — the browser cuts the typing off before the check has anything to catch. Minimum characters is checked only when the field has something in it: an empty box is not "too short", it is empty. Pair a minimum with Required if you want blank answers stopped too.
To limit how many choices a customer ticks rather than how much they type, use Min selections (0 = none) and Max selections (0 = unlimited) on a Multiple choice field. The maximum is also enforced as the customer ticks — once the cap is reached the remaining boxes are disabled — so Please select at most N. is a backstop; Please select at least N. is the message customers actually meet. See Choice fields and swatches.
Show a character counter
Show character counter sits with the character limits, is off by default, and is again offered only on Text and Text area. Switch it on and the customer sees a live count as they type — small grey text, right-aligned under the box.
- With a Maximum characters value set, the counter reads
12 / 200. - Without one, it shows the length on its own:
12.
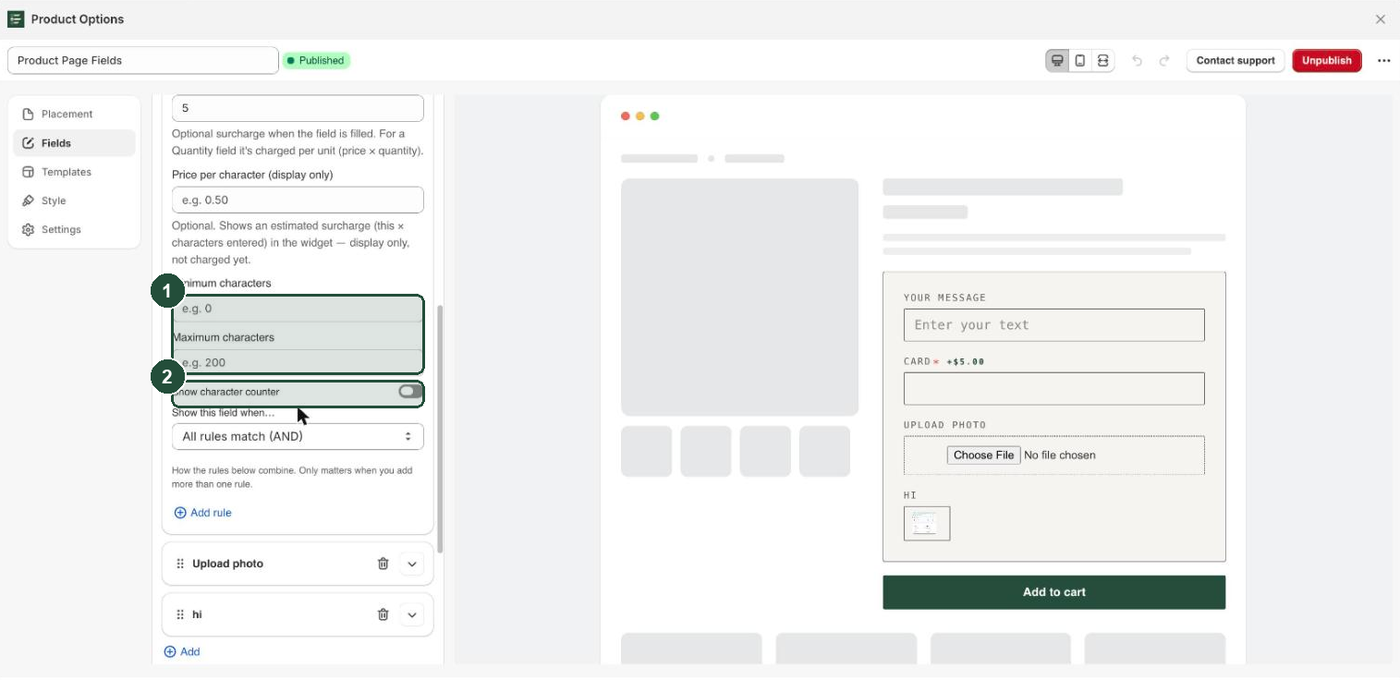
The counter does not run in the customizer's live preview — it shows a fixed 0 there. Check it on your published storefront.
Number and quantity ranges
A Number field has three range settings: Minimum value, Maximum value and Step. The stepper arrows respect them, and Everfield checks the range itself on every add to cart — including on themes that add to cart with their own script, and when the options block sits outside the add-to-cart form. A number below the minimum shows Please enter at least N., one above the maximum shows Please enter at most N., and the add is blocked. The range is checked only when the field has something in it; pair it with Required if a blank answer should be stopped too.
Step is not checked by Everfield — the arrows move in steps, but a customer can still type a value between them. If only certain amounts are acceptable, use a Dropdown or Radio buttons listing them.
A Quantity field does not offer those controls at all. It starts at 0, steps by 1, and cannot go below 0. Marking a Quantity field Required means the customer must raise it above 0 — left at 0, it shows This field is required. and blocks Add to cart.
How validation interacts with hidden fields
A field that a conditional rule is currently hiding is skipped by validation, and its value is not sent to the cart. A hidden required field therefore never blocks Add to cart, and its answer never reaches the order.
That is deliberate — an irrelevant question should not stop the sale — but it changes what Required guarantees: an answer while the field is visible, not on every order. The value a customer typed before the field hid is kept in the browser and reappears if the rule matches again, and a value already saved on a cart line stays there even when the field is later hidden. See Show a field only when it is relevant.
Where validation does not run
- The per-line cart editor. When a cart experience finds answers already on a cart line and shows one prefilled editor per line, no validation runs there at all — no required check, no length check, no guard on the checkout click. A customer can clear a required answer on a cart line and check out. A cart experience validates only in its ordinary mode, where the fields collect one set of answers.
- The customizer live preview. The preview renders your fields and runs conditional rules, but not the character counter or the maximum-selections cap.
- Anywhere the browser is bypassed. These checks run in the customer's browser as they shop. Orders you create in the Shopify admin, draft orders, and apps that post to the cart directly never run them.
Troubleshooting
Required is on but customers still add to cart without answering. Two usual causes: the experience is still a Draft, so the storefront has nothing (or an older published version); or a conditional rule is hiding the field, so validation skips it.
There is no red asterisk next to my required field. The asterisk is controlled separately, in the Style tab under Visibility. Switch on Show required (*) indicator. The field is required either way. If labels themselves are hidden — Show field labels in the same section — there is nothing for the asterisk to sit beside.
The character counter shows 0 and never moves. You are looking at the customizer preview, where the counter does not run. Publish and check the storefront.
Minimum characters is not stopping empty answers. The length check runs only on a field that has something in it. Switch on Required as well.