9 min readUpdated 6 October 2026
Targeting decides where a published experience appears — engraving fields only on your engravable products, a gift note only on the gift collection, nothing at all on clearance. You set it per experience on the Settings tab of the customizer, and a straightforward product or collection rule takes about two minutes. Targeting is a paid feature: it needs the Advanced plan or Unlimited Plus.
Where targeting lives
- On the Everfield dashboard, open the experience you want to limit.
- In the customizer, click the Settings tab in the tab rail on the left.
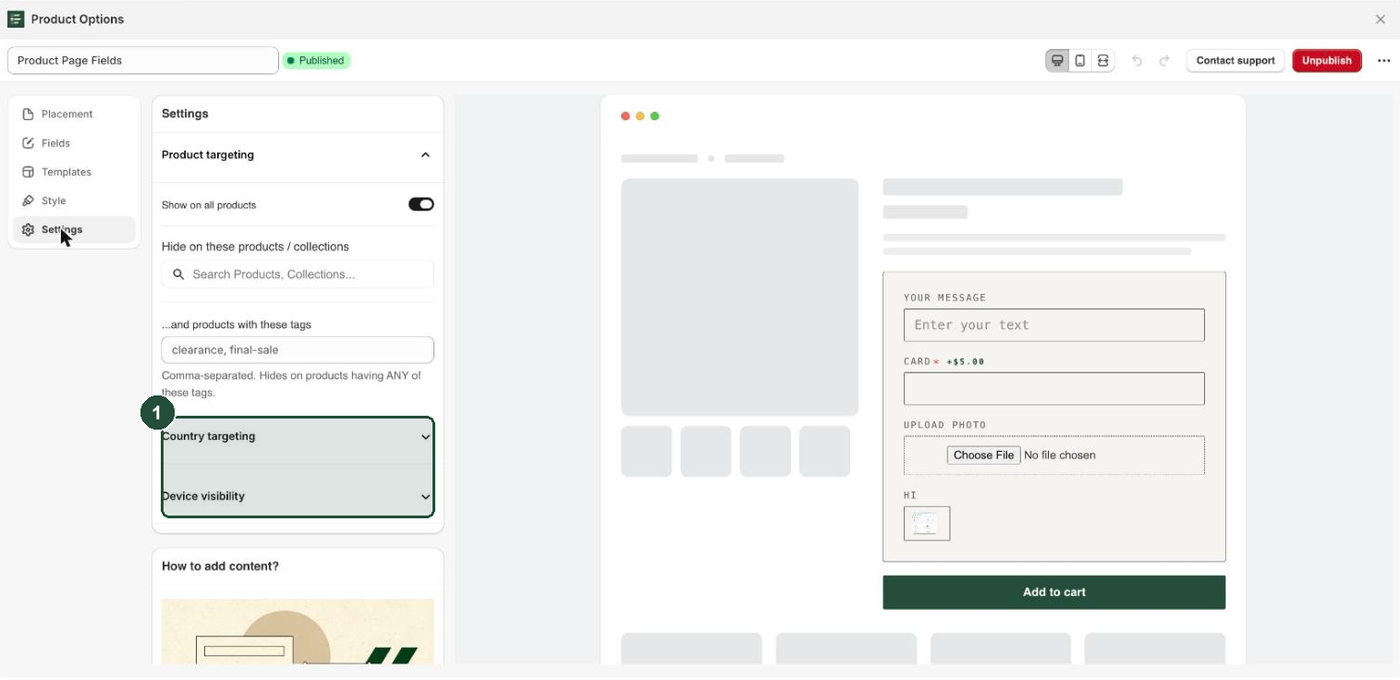
- Expand the section you need. There are three, and they are independent: Product targeting, Country targeting and Device visibility.
Four things to know before you start.
- Targeting shows or hides the whole experience, not one field inside it. To hide a single field based on an answer or the selected variant, use conditional logic instead.
- Saving is what pushes rules to your storefront. On an experience that is already published, Save rewrites your storefront data straight away — there is nothing else to click. A draft has to be published first: the primary button turns into Publish once there are no unsaved changes. Careful here — on an experience that is already published, that same button reads Unpublish, so don't click it out of habit.
- The live preview ignores targeting. The preview always draws your fields, whatever your rules say. Check the result on a real product page.
- All three sections need the Advanced plan. On Free or Basic the controls are shown but inert, with an information banner and an Upgrade to Advanced button. If you try to save targeting anyway, the save is refused with "Targeting is not included in your current plan. Upgrade to Advanced to use it." Targeting you set up on a paid plan keeps working and stays editable if you later downgrade — only newly added targeting is refused.
Target by product or collection
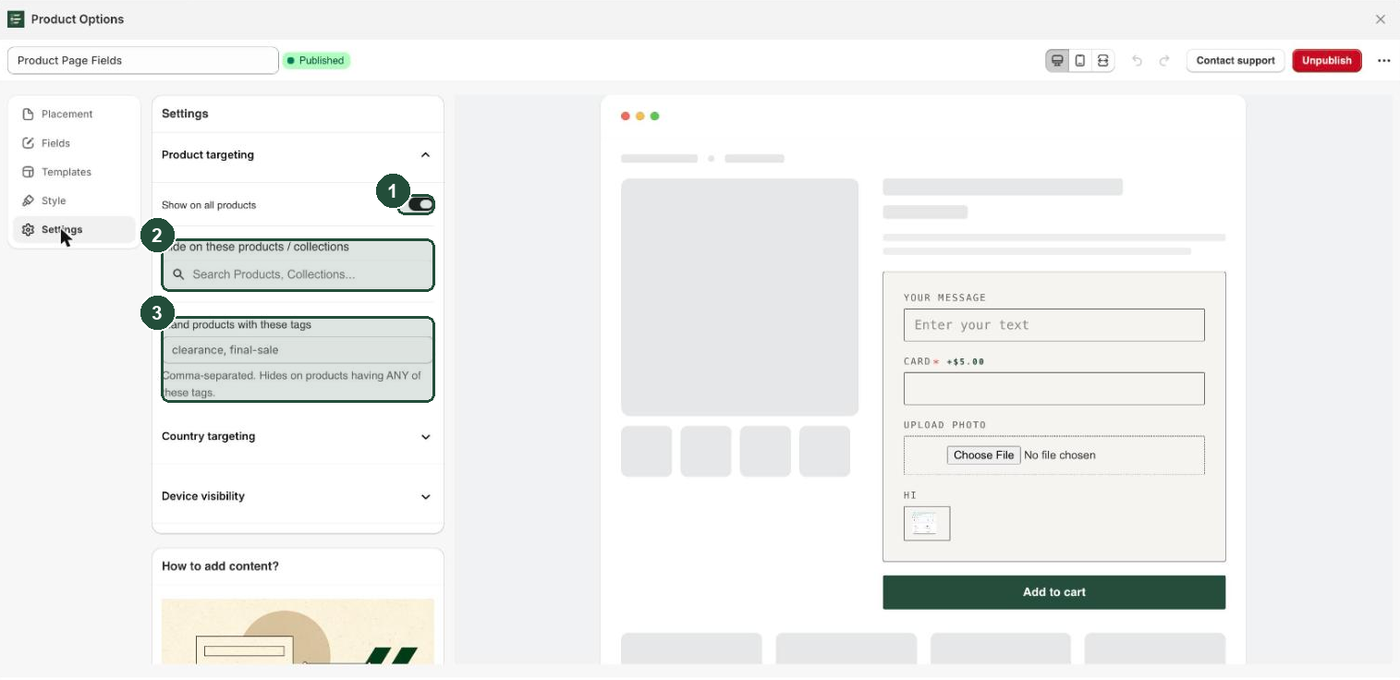
Product targeting is driven by one toggle, Show on all products, which is on by default. The fields underneath change depending on which way it is set.
Toggle on (the default) — show everywhere except a list. You get Hide on these products / collections, a search box that looks up your catalogue, and ...and products with these tags. Anything you list is an exception; everything else still gets the options.
Toggle off — show only on a list. You get Show only on these products / collections with the help text "Pick products and/or collections the widget should appear on.", and ...or products with these tags.
To limit an experience to a handful of products:
- Open the experience and go to the Settings tab.
- Expand Product targeting.
- Turn Show on all products off.
- Click into Show only on these products / collections and start typing. The placeholder reads "Search Products, Collections...". Select each product or collection you want; they stack up as a list you can remove items from.
- Click Save. If the experience is still a draft, click Publish as well — the button turns into Publish once there is nothing left to save.
- Open one of those products on your storefront, then open a product that is not on the list, and confirm the options appear on the first and not the second.
A few details that decide whether a rule matches:
- A collection matches every product in it. Everfield reads the collections the product belongs to on the page itself, so both automated and manual collections work. If a product is not in the collection in Shopify, it will not match.
- The lists are checked with OR. In "show only" mode a product qualifies if it matches the picker list or carries one of the tags. In exception mode, matching either one hides the experience.
- An empty rule filters nothing. With Show on all products off and both fields empty, there is nothing to test against, so the experience shows on every product. Turning the toggle off is not on its own a way to hide an experience — use Unpublish for that.
- Product, collection and tag rules only apply on product pages. They need a product in context. For a cart experience this matters: the product rules are applied when a slide-cart opens on a product page, and ignored entirely on the
/cartpage. Country and device rules apply everywhere.
Target by product tag
Tags are the low-maintenance option. Instead of editing an experience every time you add a product, tag the product in Shopify and let the rule pick it up.
- In Shopify, add a tag such as
engravableto the products you want (Products → the product → Tags). - In the experience, expand Product targeting.
- To show only on tagged products, turn Show on all products off and type your tags into ...or products with these tags. To hide on tagged products, leave the toggle on and type them into ...and products with these tags.
- Separate them with commas, as the help text says: "Comma-separated. Shows on products having ANY of these tags." (The hide field says "Hides on products having ANY of these tags.") The placeholders show the shape —
engravable, gift, personalizedandclearance, final-sale. - Click Save. If the experience is still a draft, click Publish as well.
How tag matching behaves:
- Any tag counts. A product matches if it carries at least one tag from your list, not all of them.
- Case does not matter.
Engravableandengravableare the same tag. Spaces around the commas are trimmed for you. - The whole tag has to match.
giftdoes not match a product taggedgift-wrap. Type the tag exactly as it appears in Shopify. - New products are picked up straight away. The product's tags are read live on each page load, so tagging another product makes it match immediately — no republishing needed. Changing the tag list in Everfield does need a save.
Show options in only certain countries
Country targeting is a separate collapsible section with its own toggle, Show in all countries, on by default.
- Expand Country targeting.
- Turn Show in all countries off.
- In Show only in these countries, search for each country you want to keep the options in. The search box placeholder is "Search countries...".
- Click Save. If the experience is still a draft, click Publish as well.
The country Everfield reads is the one from your storefront's country and market selector — the same value your theme uses for prices and currency. It is not IP geolocation and it is not the shipping address the customer types at checkout. If your store sells in a single market, every visitor reads as that one country and a country rule will not do much.
To do the opposite — show the options everywhere except a few countries — leave Show in all countries on and list those countries in Hide in these countries, then click Save. Each toggle position uses only the list shown under it: with the toggle off, a hide list saved earlier is ignored, and with it on, the show-only list is ignored.
Hide options on mobile or desktop
Device visibility is the third collapsible section. It has two toggles, both off by default: Hide on mobile and Hide on desktop. Switch one on to drop the experience on that device.
- Mobile means a narrow viewport — 767 pixels wide or less. The breakpoint is fixed and cannot be changed.
- It is measured once, when the page loads. Resizing your browser window or rotating a phone after the page has loaded does not re-run the check, so test by loading the page at the width you care about rather than dragging the window.
- Turning both on hides the experience everywhere. There is no third state.
Why only one experience shows at a time
This is the behaviour that surprises most merchants, so it is worth stating plainly.
Everfield renders one published experience per placement. On a product page it takes the first published product-page experience whose targeting passes, renders it, and stops. The cart is a separate placement with the same rule. So one product-page experience and one cart experience can both be live, but two product-page experiences cannot appear together on the same product — even when both match it.
There is no stacking and no ordering control. The experience that gets checked first tends to be the one saved most recently, which means editing an unrelated experience can change which one wins. Do not rely on the order. Instead:
- Make your rules mutually exclusive. If experience A is limited to the
engravabletag, exclude that tag on experience B, so exactly one of them can match any given product. - Or merge them into one experience and use conditional logic to show and hide individual fields. One experience with rules is easier to reason about than two competing ones.
- Or unpublish the one you are not using. A draft experience is never rendered and never competes.
Troubleshooting
The targeting sections are visible but nothing can be changed. Targeting needs the Advanced plan or Unlimited Plus. Use the Upgrade to Advanced button on the banner above the section, or see Plans and billing.
Saving is refused with "Targeting is not included in your current plan." Same cause. Either upgrade, or reset the section: turn Show on all products and Show in all countries back on, clear the lists, and switch both device toggles off.
I changed the rules and the storefront still behaves the old way. Targeting travels to your storefront data when you save. Click Save, let it finish, then reload the product page. If the experience is still a draft, publish it — a draft is never written to your storefront at all.
The options vanished from every product after I switched Show on all products off. In that mode the product has to match something on your list. Check the product really is in the collection you picked, or that it carries one of the tags you typed — and remember tags must match in full.
I switched Show on all products off but the options still appear everywhere. Both fields are empty, so there is nothing to filter against. Add at least one product, collection or tag.
My tag rule matches nothing. Compare the tag character for character with the tag on the product in Shopify. Case is ignored, partial words are not — gift will not match gift-wrap. Also confirm the tags are separated by commas, not spaces or new lines.
My cart options ignore their product targeting on the cart page. That is expected. The /cart page has no product in context, so product, collection and tag rules are skipped there. Only country and device rules apply on the cart page.
My country rule does nothing. Check you filled in the list shown for your toggle position: Show only in these countries with Show in all countries off, or Hide in these countries with it on. Also check the country is being set by your storefront's country selector; targeting reads that, not the customer's IP address or checkout address.
Two experiences match the same product and only one shows. That is by design — one experience renders per placement. Make the rules mutually exclusive, or combine the fields into a single experience.
Everything looks right and still nothing shows. Targeting may not be the problem. Work through My options aren't showing, which covers publishing status, the app embed and theme placement.