8 min readUpdated 6 October 2026
If you print, engrave or personalise what you sell, you need the customer's artwork before you can start work. Everfield's File / image upload field puts an upload box on your product page, sends the file to your own Shopify Files library, and saves the link on the order. Setting one up takes about five minutes.
Add the upload field
Go to Apps → Everfield - Product Options and open the experience you want to add the field to. If you don't have one yet, click Create experience on the dashboard and build it first — see Create your first experience.
Click the Fields tab.
Click Add. A new field row appears at the bottom of the list.
Click the chevron on the right of the new row to expand it.
Set Field type to File / image upload. The settings underneath change to the upload settings.
Type a Label, for example
Upload your photo. The label is what the customer reads on your storefront, and it is also the property name the value is saved under on the order — so keep it short and recognisable.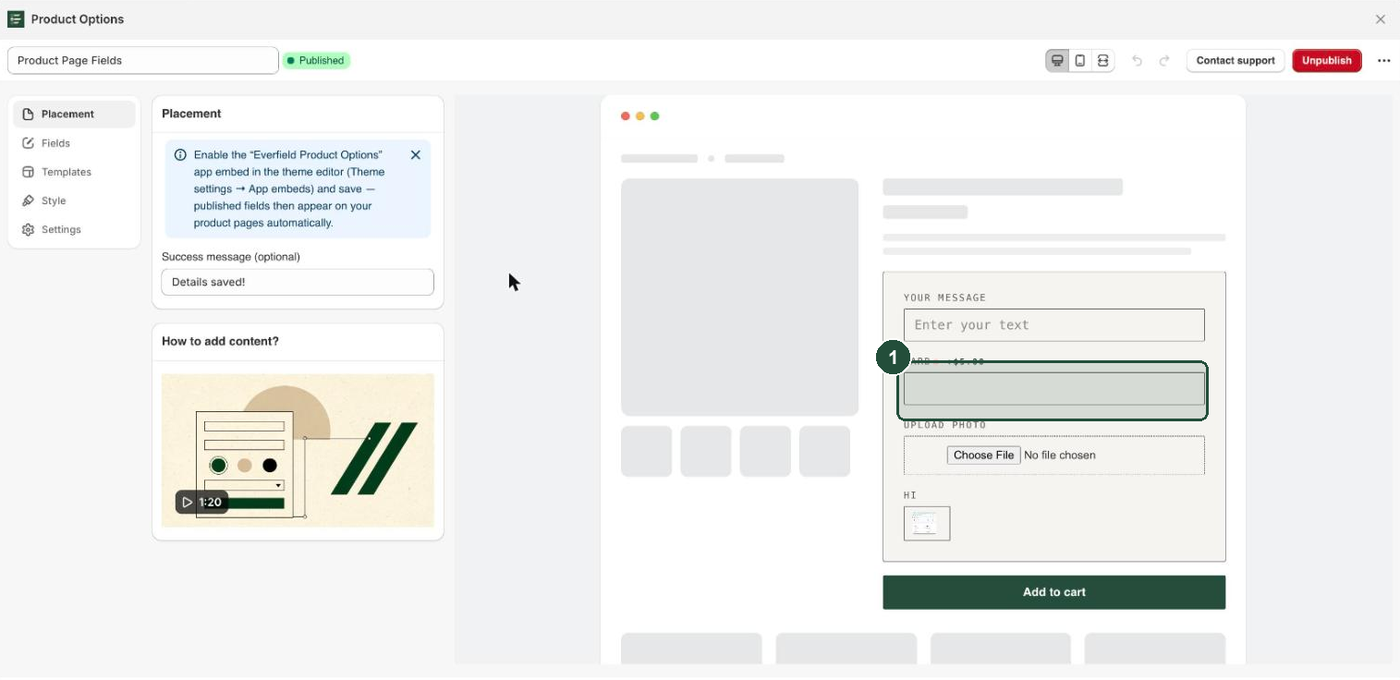
1 The upload field in the live preview Optional: add Help text (something like "JPG or PNG, up to 5 MB"), switch on Required if you can't fulfil the order without a file, and set an Add-on price if you charge for the personalisation. See Charge for options. Add-on price only appears on a product-page experience — a cart-placement experience can't charge, so the price boxes aren't offered there.
Choose Allowed file types. There are four choices: Images only, Documents (PDF, Word, etc.), Archives (zip, rar) and Any file type. New upload fields start on Images only.
Click Save, then Publish.
Note: Allowed file types only sets the filter the customer's browser applies when the file picker opens. It is a hint, not a rule — a customer can still pick something else, and the app does not check their selection against the preset you chose. What the app does enforce, on every upload, is one fixed list: PNG, JPG, JPEG, GIF, WEBP, SVG, PDF, DOC, DOCX, XLS, XLSX, TXT, RTF, ZIP, RAR and 7Z. So a customer on an Images only field who picks a PDF anyway will have it accepted; only a file outside that fixed list is refused.
Size and count limits
Two settings control how much a customer can send. Both are checked in the browser before anything is uploaded, so a rejected selection never leaves their computer.
Max file size (MB) is a slider from 1 to 5, set to 5 by default. If a customer picks anything larger, the field shows Each file must be under 5MB. and clears their selection.
Note: 5 MB is Everfield's own ceiling, not a Shopify one — Shopify Files accepts images up to 20 MB. If the cap is getting in your way, tell support: it is a limit we set, so it is one we can look at.
Allow multiple files is off by default, which means one file per field. Directly under it sits Max number of files, a free-text box with the placeholder e.g. 5. It is always on screen for an upload field, but it only does anything while Allow multiple files is switched on — with the toggle off the field takes one file whatever you type there. Leave it empty and there is no count limit — the customer can attach as many files as they like, subject to the size cap on each. Set a number and a customer who picks more sees Please select at most 3 file(s). (with your number in place of 3) and nothing uploads.
What the customer sees while uploading
- They click the upload box and pick a file.
- The preview area under the field shows Uploading…, and the Add to cart button is switched off so they can't submit an order that is missing the file. If they click a checkout button anyway, they get
Please wait for the upload to finish. - When it finishes, the preview shows a thumbnail of the image. For a non-image file, such as a PDF, it shows the file name as a link they can click to check what they sent.
- Add to cart is switched back on and they can carry on.
Files upload one after another, not all at once. Five files take roughly five times as long as one, so give the upload a moment before assuming it has stalled. If an upload doesn't complete, the field shows Upload failed. Try again. and the customer can pick the file again.
If you made the field Required and the customer tries to add to cart without uploading, they see Please upload an image.
Where the file ends up
The file goes to your Shopify account, not to Everfield's servers. The customer's browser sends it through the app to Shopify's Files API, and Shopify stores it and returns a permanent CDN link. You can see every uploaded file in your Shopify admin under Content → Files.
Because the file belongs to your store, uninstalling Everfield does not delete it or break the link on the order.
What gets saved to the cart is the link, not the file itself:
- On a product page, the link is saved as a line item property on that item, named after your field Label.
- On the cart, the link is saved as an order attribute, again named after your field Label.
If you allowed multiple files, all the links land in one property as a single comma-separated list. You will not get one property per file.
Note: The links are long and effectively unguessable, but they are not password-protected. Anyone you send one to can open the file. Treat them like unlisted links when you forward them to a printer or supplier.
Everfield never deletes uploaded files, and there is no delete button in the app. If you want to clear old customer artwork out, delete it yourself in Content → Files.
Finding the file on an order
- In your Shopify admin, open Orders and click the order.
- A file collected on the product page appears with the line item it belongs to. A file collected on the cart appears with the order's other details, not against any single item.
- Click or copy the link to open the file.
Everfield also lists recent answers in one place. In the app, open Submissions — subtitled Custom field values captured on recent orders. The table has six columns: Order, Date, Product, Field, Value and Source. Source reads Line item for a product-page field and Order attribute for a cart field, and fields that match one of your experiences get a green Experience field badge. Long values, including upload links, are shortened in the table — hover to see the whole thing.
Submissions reads your 25 most recent orders each time you open it, and it has no search, date filter, pagination or export. For anything older, or to pull upload links out in bulk, it depends where the file was collected. Links from a cart upload come out in Shopify's own order export, in the CSV's Note Attributes column. Links from a product-page upload do not — line item properties are not one of Shopify's export columns — so read those on the order, or use an order-export app that supports line item properties, or the Shopify API. See Find answers on orders.
Troubleshooting
The customer gets "Upload not available. Try again later.". The widget rendered but couldn't read the app-proxy address that Everfield writes into the page, so it had nowhere to send the file. Ask the customer to hard-refresh — a stale cached page is the usual cause. If it happens on every load, open your published theme and re-save the Everfield app embed — see Turn on the app embed.
The customer gets "Upload failed. Try again." on a file that looks fine. The extension is most likely outside the fixed list above, or Shopify refused the file. The customer never sees why: the app's own reason ("Invalid file type", "File too large") is thrown away by the storefront, so every failure reads the same one line. Check the extension against the list, then ask the customer to re-save the file as a PNG or JPG and try again.
"Each file must be under 5MB." on a photo straight from a phone. Phone photos regularly exceed 5 MB, and 5 MB is Everfield's own ceiling — not Shopify's, which is higher. For now, ask for a resized copy or collect a file-sharing link in a text field instead, and tell support if this is blocking you.
The customer says the button was greyed out. That is intended. Add to cart is disabled while a file is uploading and comes back as soon as the upload settles.
Several files were uploaded but the order shows one line. That is how it works — all the links are stored together in one property, separated by commas. Copy the whole value and open each link in turn.
A link on an old order doesn't open. Rarely, if Shopify's file processing takes longer than the roughly 20 seconds the app waits, the value saved on the order can be a temporary upload link rather than the permanent CDN one, and it expires. The file itself is still in your admin: open Content → Files, sort by date and find it by the time the order came in.
The upload field never appears on the storefront. That is a placement or publishing problem rather than an upload one. See My options aren't showing.